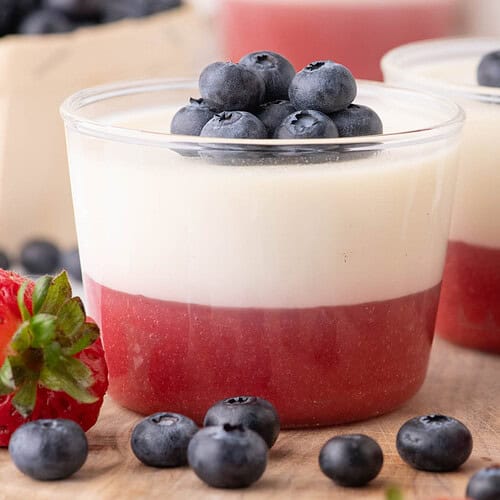
Coconut Panna Cotta with Berry Layers
Creamy Coconut Panna Cotta with Berry Layers combines subtle tropical coconut flavor with a bright strawberry layers for an elegant and easy make-ahead summer dessert.*Quick Note Before You Dive In: This recipe card covers the basics, but if you want to know how to create clean, defined panna cotta layers without them blending together, scroll back up! Everything you need for foolproof results is in the post.
Ingredients
- 1 pound (454g) fresh strawberries hulled
- 1 cup (198g) granulated sugar divided
- Pinch of salt
- 3 ½ teaspoons (10g) unflavored gelatin powder
- 1 cup (227ml) heavy cream
- 1 can (400ml) full-fat coconut milk unsweetened
- 6 ounces fresh blueberries
Instructions
Make the purée:
- Place strawberries, ½ cup sugar, and a pinch of salt into a blender or food processor and blend until smooth.
- Pour the purée into a small saucepan and sprinkle with 1 teaspoon gelatin powder. Let the mixture sit undisturbed for 10-15 minutes to hydrate; the surface of the purée will form a skin and appear wrinkled (this is normal).
- Over medium heat, stir the mixture until the gelatin dissolves. Scrape down the sides and bottom of the saucepan with a soft silicone spatula so the purée doesn’t start to congeal. Cook the mixture (stirring constantly) until it begins to foam (about 5 minutes).
- Remove the saucepan from the heat, let it cool for 5 minutes, then pour the purée evenly into each of the 4 heatproof glasses. Place them in the refrigerator for 1 hour to set.
Make the panna cotta:
- Meanwhile, in a larger saucepan, add the heavy cream and sprinkle the remaining 2 ½ teaspoons of gelatin evenly over the surface. Let the gelatin sit undisturbed for 10 minutes to hydrate. It will start to wrinkle, which is normal.
- Place the saucepan over medium-high heat and stir until the gelatin fully dissolves and the mixture is smooth (about 2 minutes).
- Add the coconut milk and remaining sugar, then continue stirring until the sugar dissolves, about 2-3 minutes.
- Pour the cream through a fine mesh sieve into a measuring cup or container with a pourable spout to remove any clumps.
- Cover the panna cotta mixture and refrigerate until slightly cooled while the strawberry layer finishes setting.
- Carefully spoon 3-4 tablespoons of the panna cotta cream over the strawberry layer to create a buffer and prevent the layers from blending together. Slowly pour the remaining panna cotta cream into each glass, dividing evenly.
- Cover the glasses with plastic wrap and refrigerate for 3 hours to allow the panna cotta to fully set.
- Once the panna cotta has set, place the blueberries on top and serve.
Notes:
The dessert cups I used have a 1-cup capacity.
Fully chill the strawberry layer before adding the panna cotta on top to help keep the layers clean and distinct.
Spoon a small amount of panna cotta over the strawberry layer first, then slowly pour in the remaining mixture. This helps prevent the layers from blending together.
Panna cotta should have a soft wobble when fully set. If it feels overly firm or rigid, too much gelatin was likely used.
Full-fat unsweetened coconut milk works best for keeping the panna cotta smooth while maintaining a brighter white appearance. Do not use coconut cream as it has a grey tinge.
Nutrition
Serving: 245gCalories: 697kcalCarbohydrates: 72gProtein: 8gFat: 46gSaturated Fat: 35gPolyunsaturated Fat: 1gMonounsaturated Fat: 6gCholesterol: 67mgSodium: 40mgPotassium: 527mgFiber: 5gSugar: 65gVitamin A: 911IUVitamin C: 74mgCalcium: 78mgIron: 2mg
Enjoy this recipe?Please leave a comment and tag me @aspicedlifeblog on social